> ## Documentation Index
> Fetch the complete documentation index at: https://neverminedag-sync-api-errors-9d14109.mintlify.site/llms.txt
> Use this file to discover all available pages before exploring further.
# BuildShip
> Protect your BuildShip workflows and monetize access with Nevermined Payments
Integrating Nevermined's access control and payment system with your existing BuildShip workflows is the quickest way to turn your low-code backend logic into a fully monetized API. This process requires setting up an **AI Agent** in Nevermined and configuring the **Nevermined Trigger** in BuildShip.
This guide assumes you have an active BuildShip account and have signed up for a Nevermined account.
## The Nevermined BuildShip Trigger
The Nevermined Trigger is a specialized node in BuildShip that is placed at the beginning of your workflow. Its function is to act as a security layer and payment middleware, validating subscriber access before your workflow logic executes.
To secure HTTP access to a BuildShip workflow endpoint for monetization.
It validates the user's **Access Token** (Bearer Token) and verifies their subscription status against a Nevermined plan.
## Step-by-step Tutorial: Monetizing a BuildShip Workflow
The goal is to secure a BuildShip endpoint so it is only accessible by users who have purchased a **Payment Plan** and provide a valid **Access Token**.
To interact with the Nevermined API, you need an API key.
1. Go to the [Nevermined App](https://nevermined.app/).
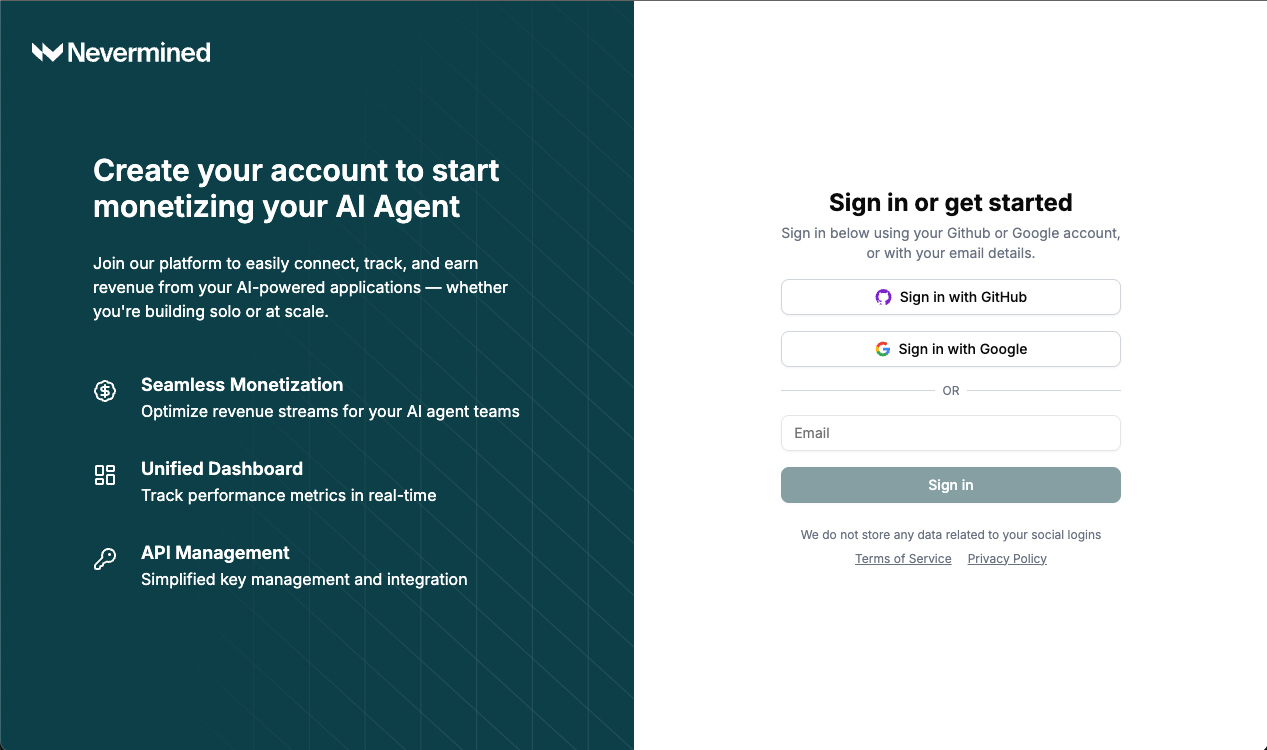 2. Log in with your preferred method.
3. In the dashboard, click on the **API Keys** menu item.
2. Log in with your preferred method.
3. In the dashboard, click on the **API Keys** menu item.
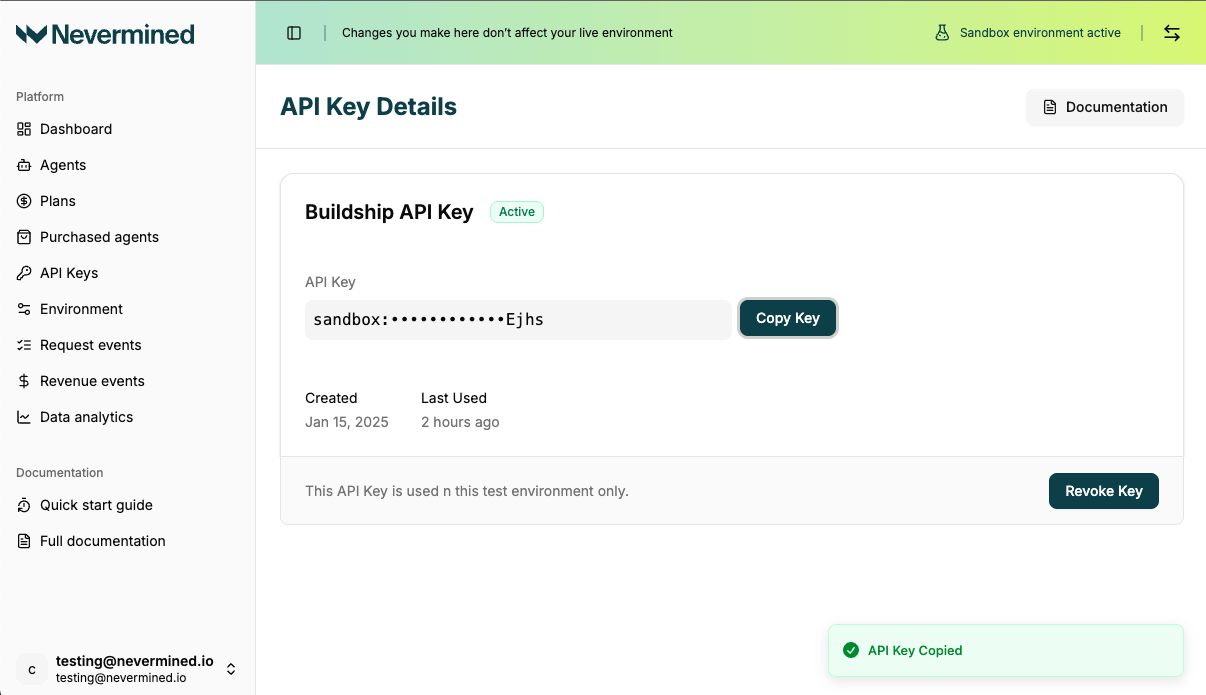
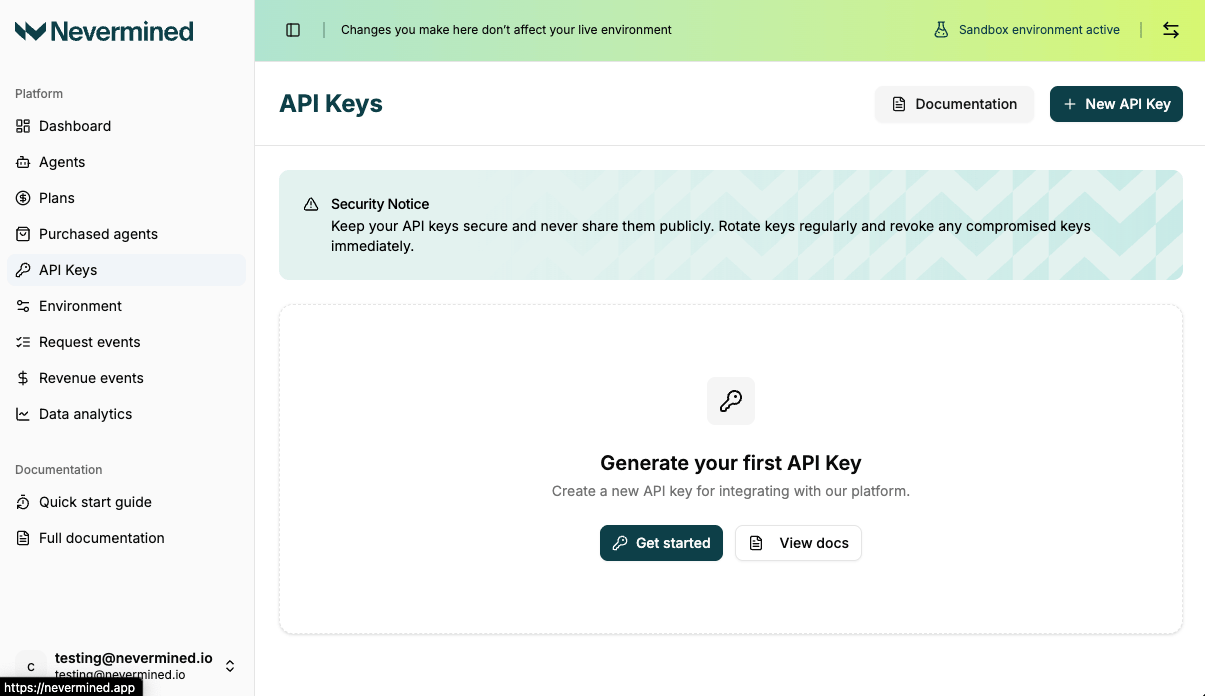 4. Click on **New API Key** button, generate a new key, give it a descriptive name, and copy it.
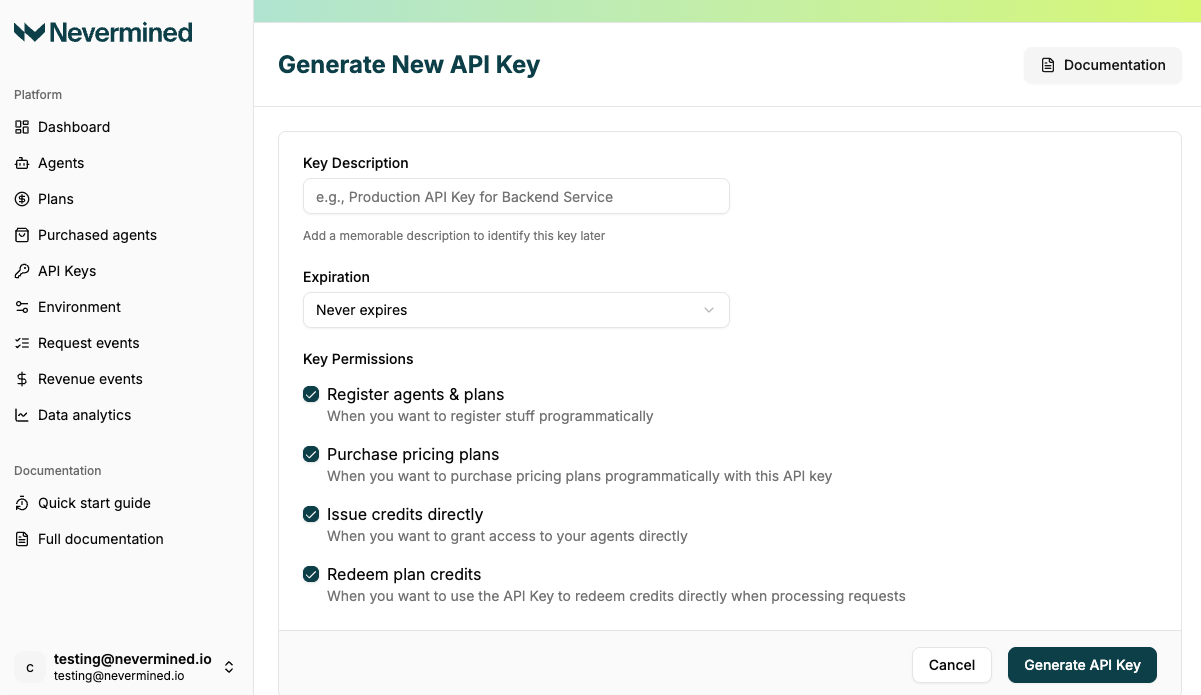 5. **Copy the generated key** and store it securely.
 You must configure the API key as a secure integration in your BuildShip workspace.
1. In your BuildShip Workspace, go to **Settings** > **Integrations**.
2. Search for **Nevermined** and click to add a new integration.
You must configure the API key as a secure integration in your BuildShip workspace.
1. In your BuildShip Workspace, go to **Settings** > **Integrations**.
2. Search for **Nevermined** and click to add a new integration.
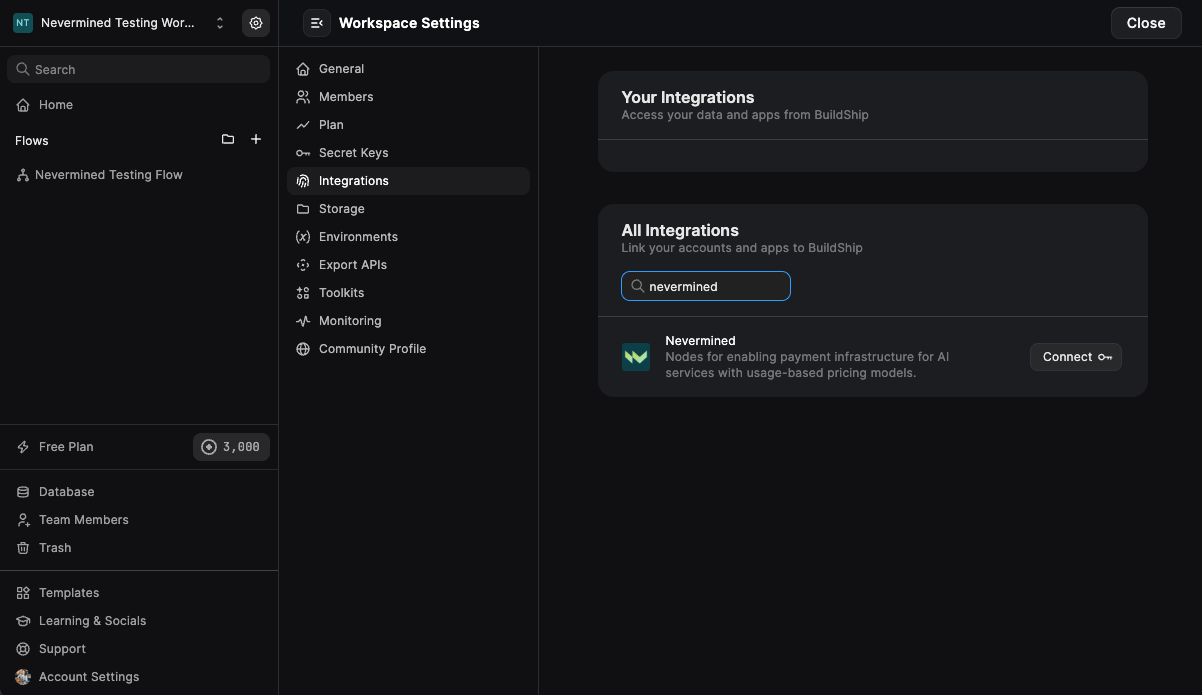 3. Provide a **Key Name** (e.g., `NVM_API_KEY`). This name will be selectable in the Trigger later.
4. Paste your Nevermined API Key (from Step 1) into the **Value** field.
3. Provide a **Key Name** (e.g., `NVM_API_KEY`). This name will be selectable in the Trigger later.
4. Paste your Nevermined API Key (from Step 1) into the **Value** field.
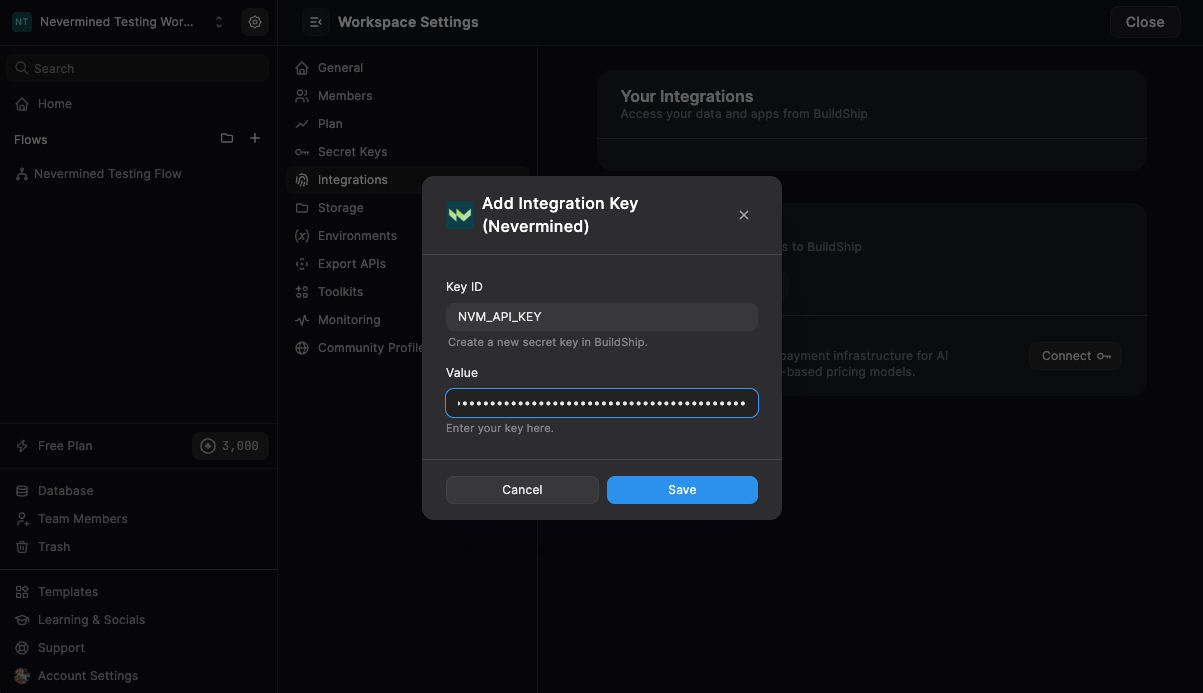 5. Save the integration to activate it in your workspace.
Now, set up the entry point of your workflow using the configured integration.
* Add the **Nevermined Trigger** node as the first node in your workflow.
* **Authentication Key**: In the trigger's configuration, select the **Key Name** you defined in Step 2 (e.g., `NVM_API_KEY`) from the dropdown menu.
* Define your desired endpoint: set the **`Path`** (e.g., `/my-backend-logic`) and the **`Method`** (e.g., `POST`).
* Connect the **`prompt`** output of the trigger to the input of the next node (your core logic).
The user's JSON request body, including the prompt, will be passed through the **`prompt`** output. Leave the **`Agent ID`** parameter empty for now.
Define the monetization rules and register your service as an AI Agent in Nevermined.
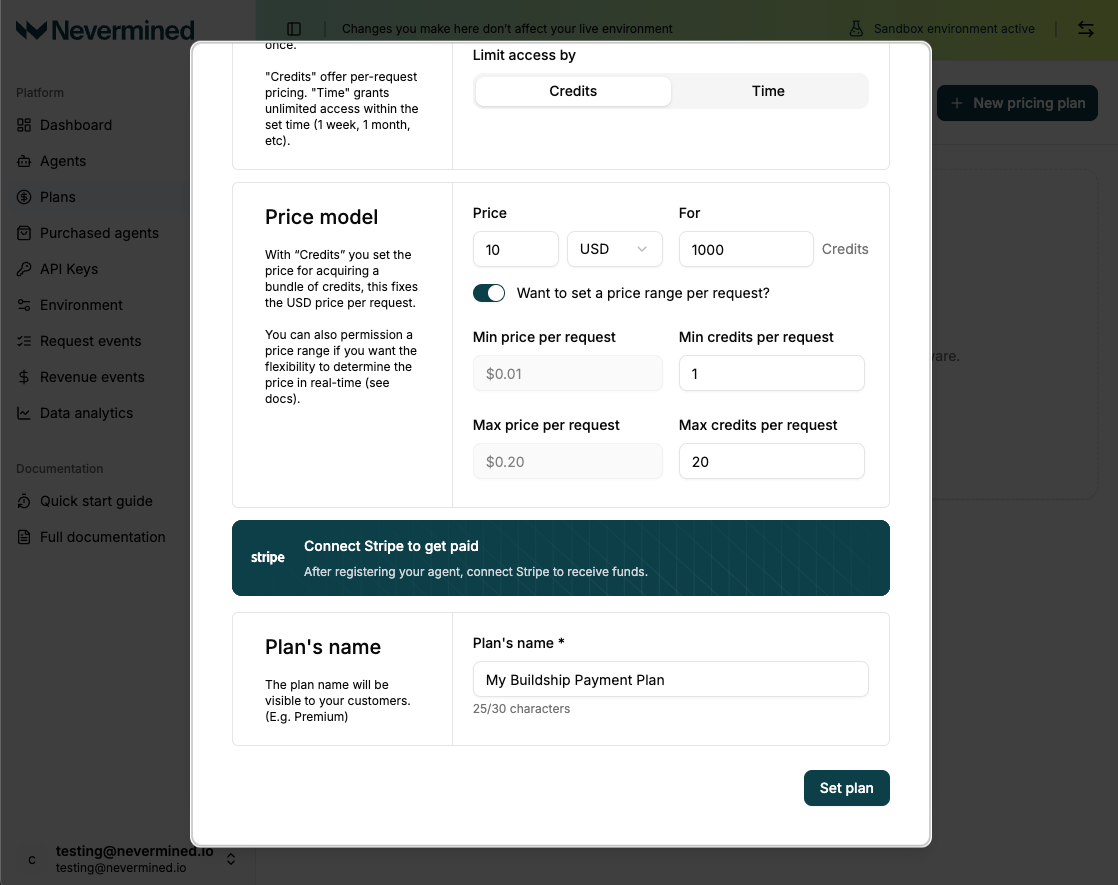
1. **Create Plan**: Create a **Payment Plan** that defines the pricing and consumption model for your service.
5. Save the integration to activate it in your workspace.
Now, set up the entry point of your workflow using the configured integration.
* Add the **Nevermined Trigger** node as the first node in your workflow.
* **Authentication Key**: In the trigger's configuration, select the **Key Name** you defined in Step 2 (e.g., `NVM_API_KEY`) from the dropdown menu.
* Define your desired endpoint: set the **`Path`** (e.g., `/my-backend-logic`) and the **`Method`** (e.g., `POST`).
* Connect the **`prompt`** output of the trigger to the input of the next node (your core logic).
The user's JSON request body, including the prompt, will be passed through the **`prompt`** output. Leave the **`Agent ID`** parameter empty for now.
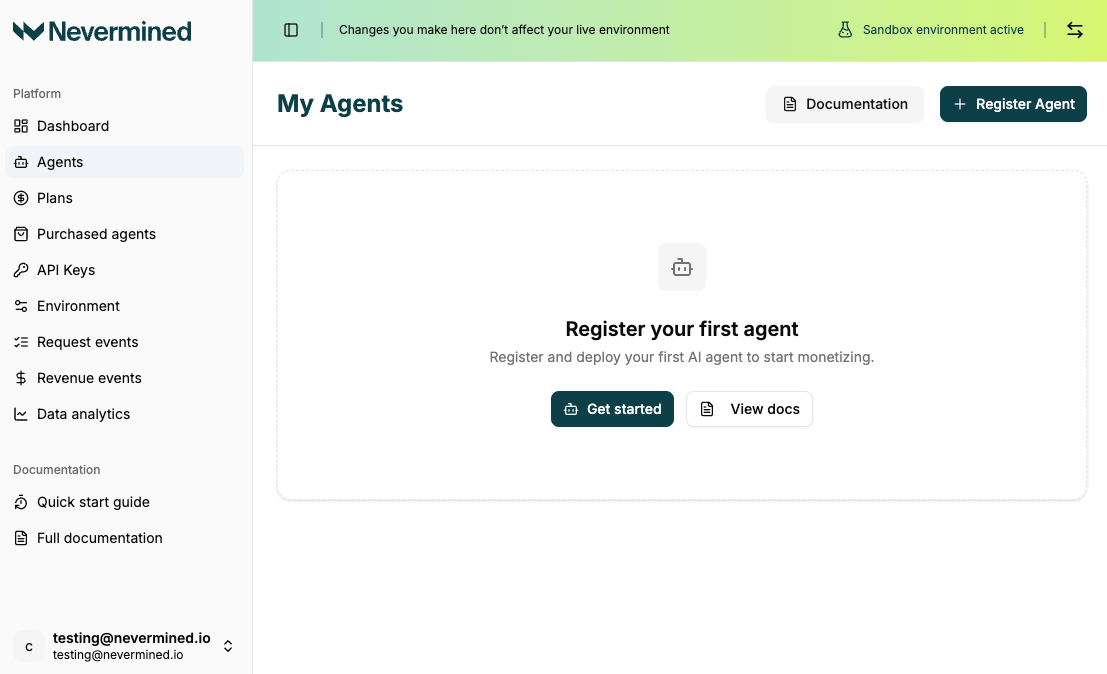
Define the monetization rules and register your service as an AI Agent in Nevermined.
1. **Create Plan**: Create a **Payment Plan** that defines the pricing and consumption model for your service.
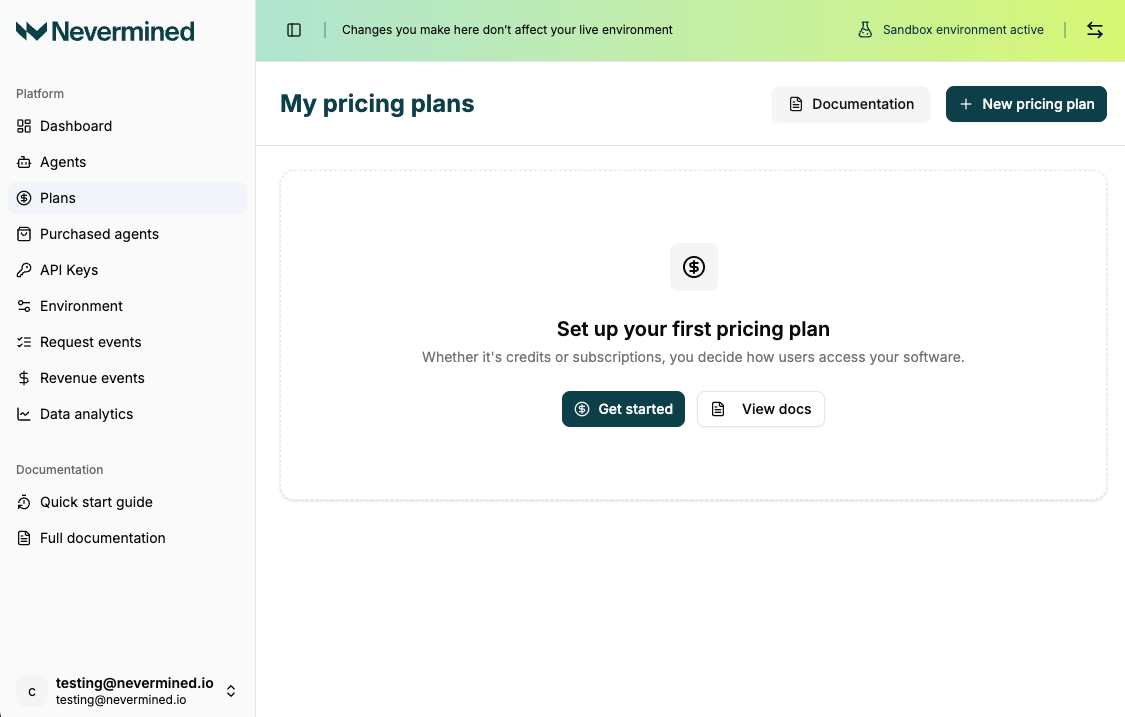
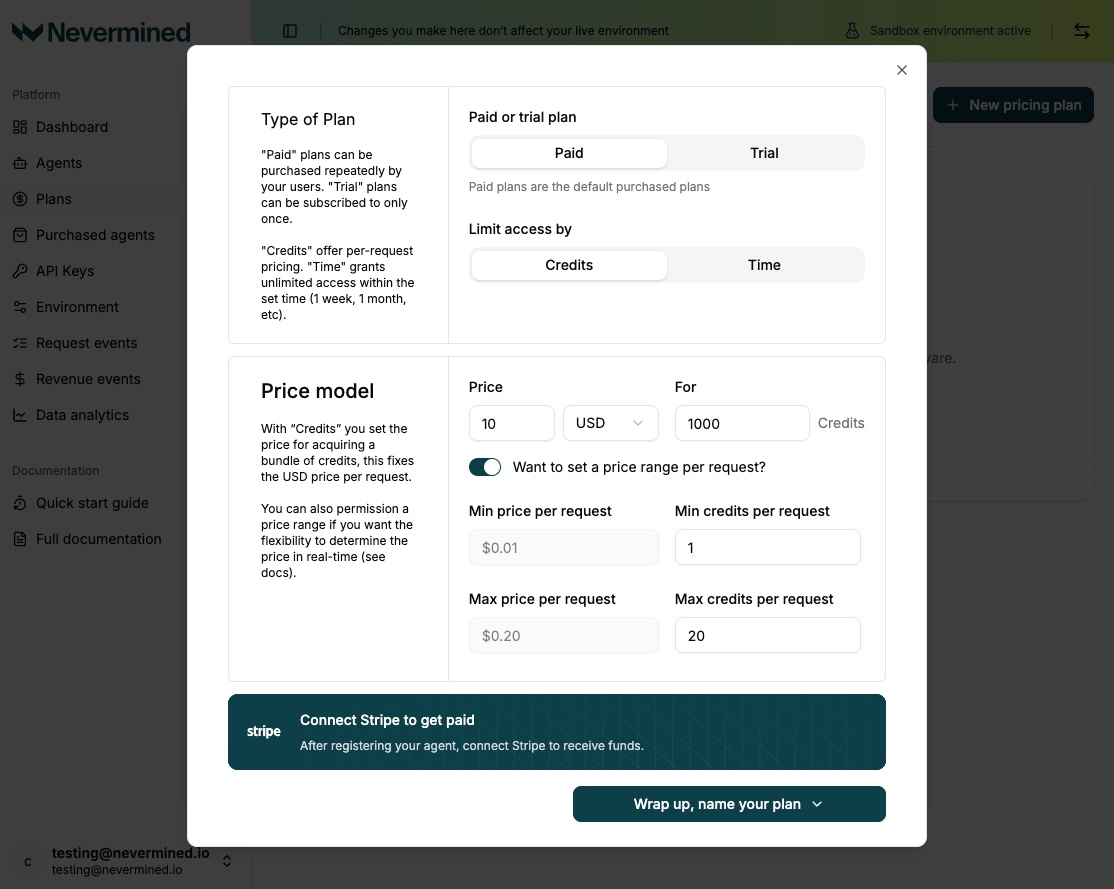
 2. **Register Agent**: Create a new **AI Agent**.
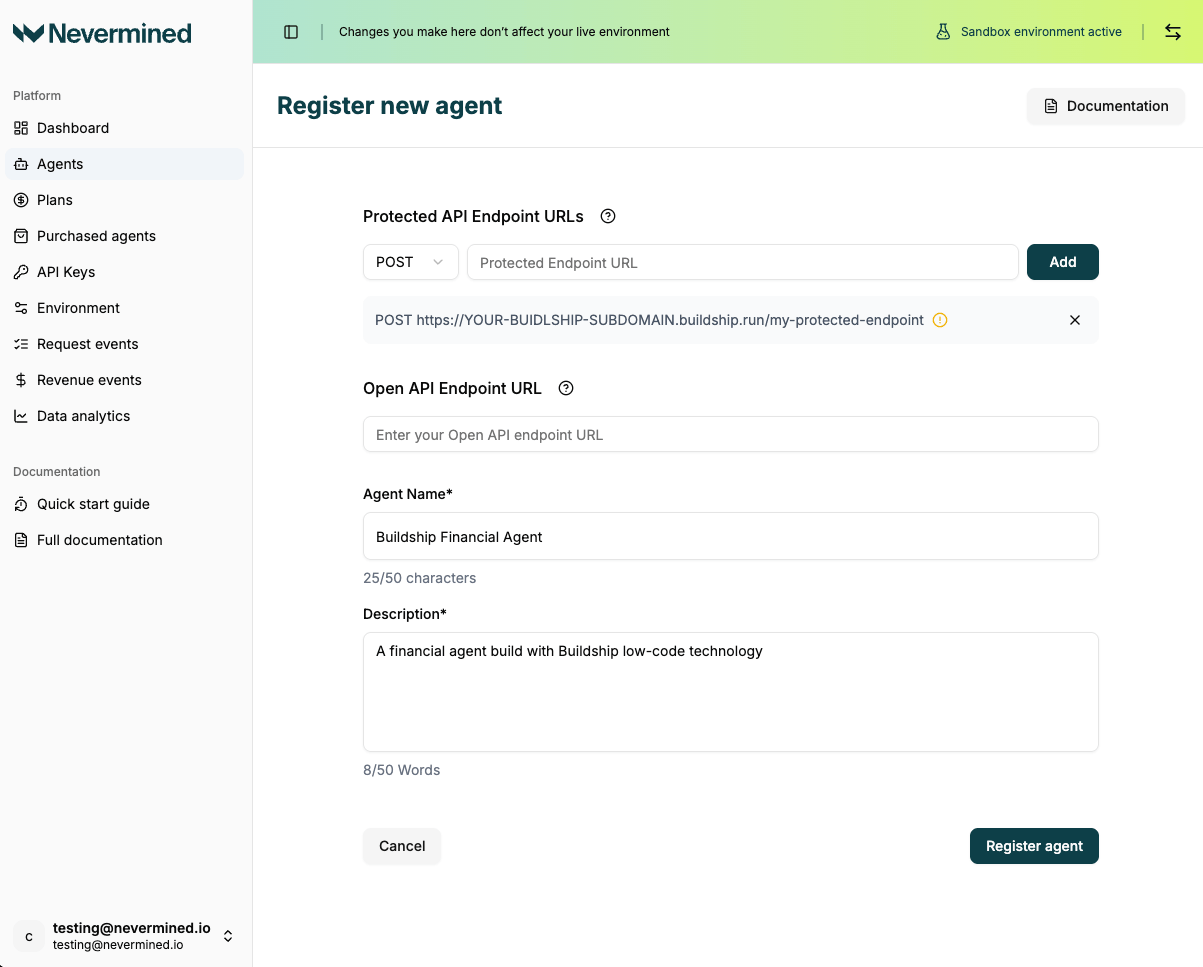
 3. **Register Endpoint**: In the Agent configuration, register the BuildShip endpoint. Ensure the **Path** and **Method** match exactly what you configured in BuildShip (Step 3).
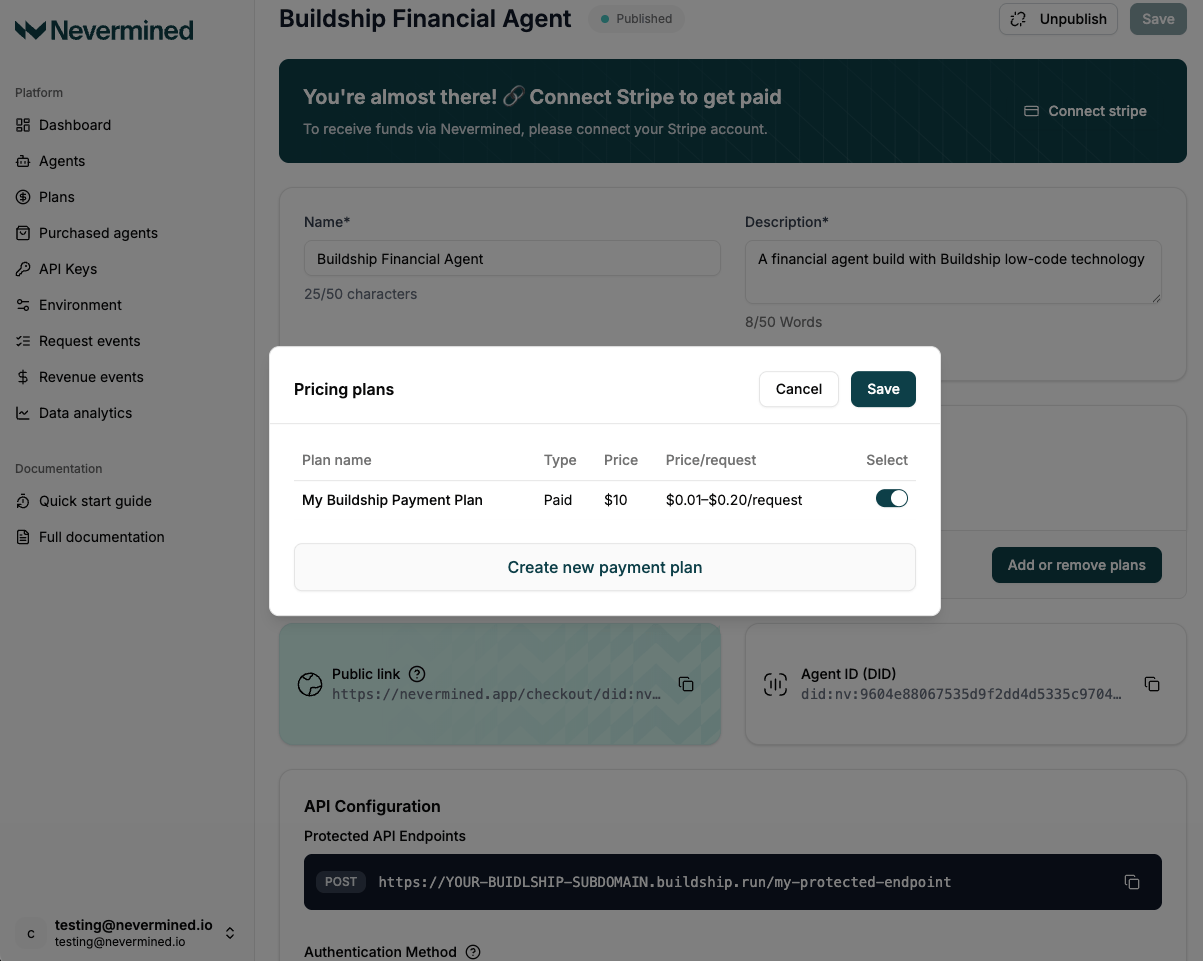
 4. **Associate Plan**: Attach the new Payment Plan to this Agent.
 Link the configured Agent back to your BuildShip workflow.
* Return to your BuildShip workflow and open the **Nevermined Payment Trigger** configuration.
* In the **`Agent Name`** field, select the **Agent Name** you just registered in Nevermined from the dropdown list.
Link the configured Agent back to your BuildShip workflow.
* Return to your BuildShip workflow and open the **Nevermined Payment Trigger** configuration.
* In the **`Agent Name`** field, select the **Agent Name** you just registered in Nevermined from the dropdown list.
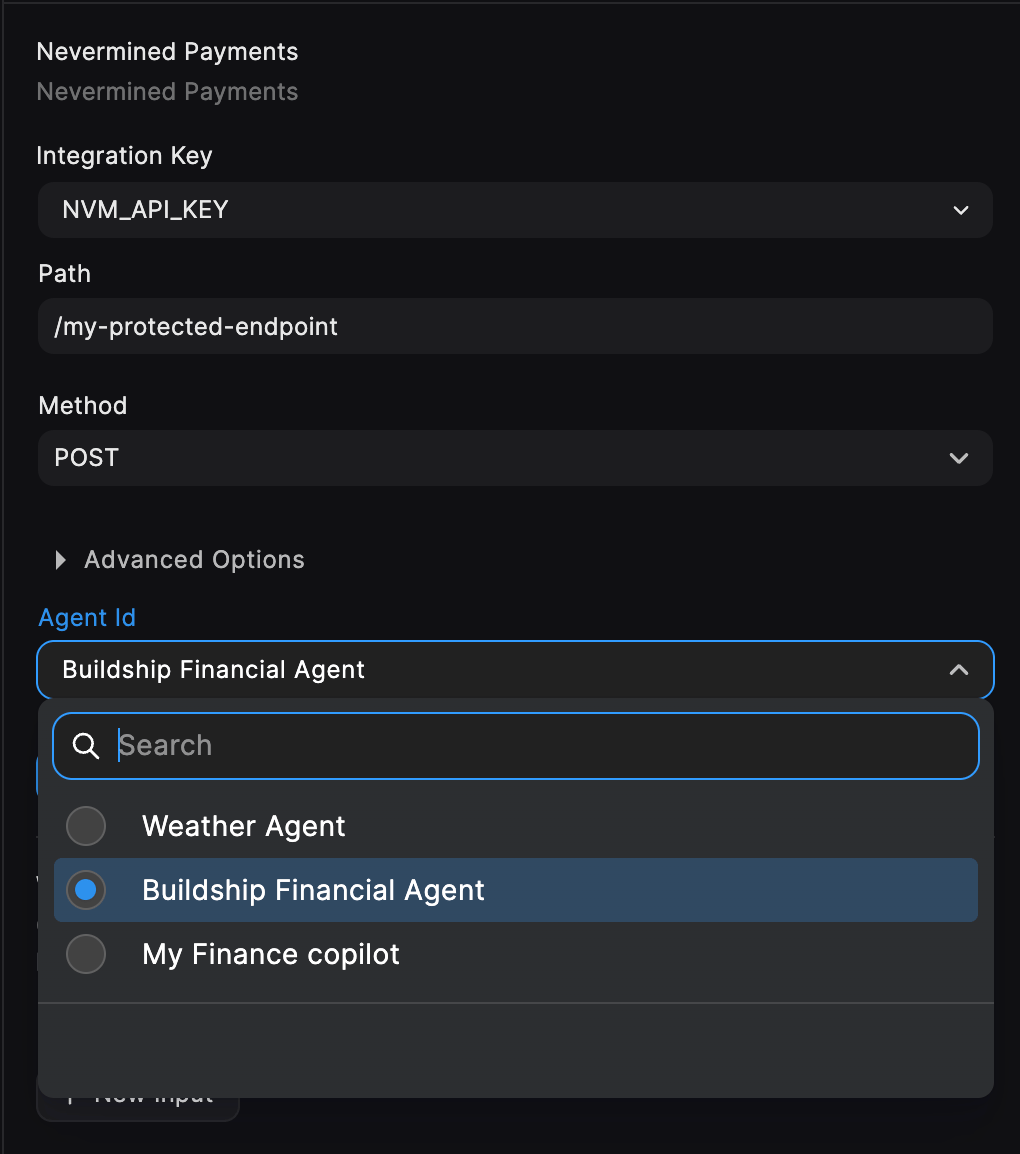 *If the ID does not appear*, close the configuration panel and reopen it to refresh the list of available Agents.
* Click **Ship 🚀** to deploy the workflow.
## User Access Flow
Once deployed, this is the complete process a subscriber must follow to successfully access your secured workflow.
The user must purchase the Payment Plan associated with your AI Agent. Upon purchase, they **generate an Access Token** (Bearer Token) from their Nevermined profile.
The user sends an HTTP request to the deployed BuildShip endpoint with two key components:
* **Header**: The **Access Token** must be included in the `Authorization` header:
` Authorization: Bearer [User's Access Token] `
* **Body**: The input data (*prompt*) for your workflow must be sent in the request body as a **JSON object** using the key **`prompt`**:
`json { "prompt": "PROMPT_TO_THE_BUILDSHIP_AGENT" } `
The **Nevermined Trigger** intercepts the request, validates the token, checks the subscription status, deducts the necessary credits, and allows the JSON `prompt` data to flow into your BuildShip logic for processing.
*If the ID does not appear*, close the configuration panel and reopen it to refresh the list of available Agents.
* Click **Ship 🚀** to deploy the workflow.
## User Access Flow
Once deployed, this is the complete process a subscriber must follow to successfully access your secured workflow.
The user must purchase the Payment Plan associated with your AI Agent. Upon purchase, they **generate an Access Token** (Bearer Token) from their Nevermined profile.
The user sends an HTTP request to the deployed BuildShip endpoint with two key components:
* **Header**: The **Access Token** must be included in the `Authorization` header:
` Authorization: Bearer [User's Access Token] `
* **Body**: The input data (*prompt*) for your workflow must be sent in the request body as a **JSON object** using the key **`prompt`**:
`json { "prompt": "PROMPT_TO_THE_BUILDSHIP_AGENT" } `
The **Nevermined Trigger** intercepts the request, validates the token, checks the subscription status, deducts the necessary credits, and allows the JSON `prompt` data to flow into your BuildShip logic for processing.